Hexo+Github+jsDelivr+Vercel建站备忘录

Hexo作为建立Blog利器,为我们没有JS基础的小白们提供了建立专属自己博客的机会!经常使用的语法很简单,我们完全可以在10min分钟之内建立自己的Blog,后期的优化才是最耗费时间的。好了,直接进入正文。
hexo clean    # 清除缓存,简写 hexo c
hexo generate # 作用:建立静态页面, 简写 hexo g
hexo deploy   # 部署自己的blog,本人部署在了Git上,简写 hexo d
hexo server   # 以启动本地服务, 可预览,简写 hexo s
hexo new blog_name # 新建以blog_name为名的blog
在.md文档中加入 <!-- more --> 可以显示“阅读全文”
参考文献 hexo-footnote
优化参考文献脚标格式。
安装 hexo-footnote,输入如下命令:
npm install hexo-footnote --save主题配置文件_config.yml中如下设置:
footnote:
location_target_class: location-target评论系统从valine 迁移至 waline
参考文章:
Next 8.x 自动添加可切换的暗黑模式
参考这篇文章,目前存在评论区waline无法正常切换的问题。
安装 Hexo 插件
安装 hexo-next-darkmode 插件
npm install hexo-next-darkmode --save配置 Hexo 插件
在 Next 主题的 _config.yml 配置文件里添加以下内容
# Darkmode JS
# For more information: https://github.com/rqh656418510/hexo-next-darkmode, https://github.com/sandoche/Darkmode.js
darkmode_js:
  enable: true
  bottom: '64px' # default: '32px'
  right: 'unset' # default: '32px'
  left: '32px' # default: 'unset'
  time: '0.5s' # default: '0.3s'
  mixColor: 'transparent' # default: '#fff'
  backgroundColor: 'transparent' # default: '#fff'
  buttonColorDark: '#100f2c' # default: '#100f2c'
  buttonColorLight: '#fff' # default: '#fff'
  isActivated: false # default false
  saveInCookies: true # default: true
  label: '🌓' # default: ''
  autoMatchOsTheme: true # default: true
  libUrl: # Set custom library cdn url for Darkmode.js
isActivated: true:默认激活暗黑 / 夜间模式,请始终与saveInCookies: false、autoMatchOsTheme: false一起使用;同时需要在 NexT 主题的_config.yml配置文件里设置pjax: true,即启用 Pjax。
关闭原生的暗黑模式
确保 Next 原生的 darkmode 选项设置为 false,在 Next 的 _config.yml 配置文件中更改以下内容:
darkmode: false国内 jsdelivr cdn 挂了
背景: 本站图床挂了,部分图片无法现实,需要挂载VPN开全局模式才可查看,这实属遗憾!。我看了下是cdn 服务提供商jsdelivr的锅!具体说下就是,我把本站所有图片放在了GitHub,然后使用了jsdelivr cdn 加速提供外链。由于去年年底jsdelivr在大陆域名备案出现了问题,结果就是国内的 cdn 无法加速,目前都只能解析到海外。后续我将对本站所有图片外链进行修复。(2022.05.17)
方案:将所有的 cdn.jsdelivr 替换成 fastly.jsdelivr 重新部署(2022.05.19)
侧边加入二维码
修改文件:themes\next\layout\_macro\sidebar.swig,在theme.back2top.enable上方加入下述代码:
<!-- 这里添加你的二维码图片 -->
<img src ="https://images.vincentqin.tech/qr-code/qrcode_realcat.jpg">
欢迎关注我的公众号
Valine使用国际版Leancloud失效
出现问题时间:2020.09.23 解决问题时间:2020.09.25 方案: 首先修改valine.swig,新增最后一行:
 new Valine({
   el: '#comments',
   verify: {{ theme.valine.verify }},
   notify: {{ theme.valine.notify }},
   appId: '{{ theme.valine.appid }}',
   appKey: '{{ theme.valine.appkey }}',
   placeholder: '{{ theme.valine.placeholder }}',
   avatar: '{{ theme.valine.avatar }}',
   meta: guest,
   pageSize: '{{ theme.valine.pageSize }}' || 10,
   visitor: {{ theme.valine.visitor }},
   lang: '{{ theme.valine.language }}' || 'zh-cn',
   path: location.pathname,
+  serverURLs: '{{ theme.valine.serverURLs }}' //新增这一行
});然后修改主题配置文件_config.yml,valine的配置项中新增一行:
serverURLs: https://xxxxxxxx.api.lncldglobal.com其中xxxxxxxx是你的AppID前8位。
最后重新部署,大功告成,参考国际版域名问题。
设置某个页面不显示TOC
修改文件themes/next/layout/_macro/sidebar.swig,找到这一句
{%- set display_toc = theme.toc.enable and display_toc %}改成:
{%- set display_toc = theme.toc.enable and display_toc and !page.no_toc %}然后在post的Front-matter中增加no_toc: true。
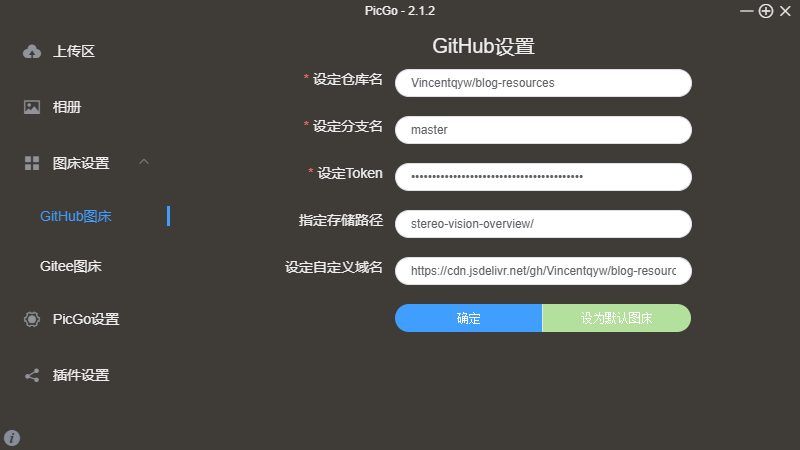
设置Github + jsDelivr图床加速
网站访问加速
页面重定向
由于之前网站post路径名字采用的样式为www.yoursite/yy/mm/dd/post_name/,后来改成了www.yoursite/posts/post_name/,这导致之前的几篇博客连接失败,为此进行重定向(redirect)。 原理就是在旧的博客每个页面的<head>部分添加两个标签:
<meta http-equiv="refresh" content="0; url=http://new.domain.com/same/relative/url/of/old/site/">
<link rel="canonical" href="http://new.domain.com/same/relative/url/of/old/site/" />
第一个是给人看的,第二个是给机器看的。
前者会自动让浏览器跳转到新的域名,后者在搜索引擎的bot下次抓取页面的时候读取,重新索引到新的URL,这里参考了猫杀的博文。
这样使得原始旧的链接: https://www.vincentqin.tech/2017/02/16/LightField%E5%85%89%E5%9C%BA/会跳转到新的链接:https://www.vincentqin.tech/posts/LightField-Toolbox/。
修复HEXO引用本地图片失败
修改hexo-asset-image插件,替换成如下内容。
'use strict';
var cheerio = require('cheerio');

// http://stackoverflow.com/questions/14480345/how-to-get-the-nth-occurrence-in-a-string
function getPosition(str, m, i) {
  return str.split(m, i).join(m).length;
}

var version = String(hexo.version).split('.');
hexo.extend.filter.register('after_post_render', function(data){
  var config = hexo.config;
  if(config.post_asset_folder){
    	var link = data.permalink;
	if(version.length > 0 && Number(version[0]) == 3)
	   var beginPos = getPosition(link, '/', 1) + 1;
	else
	   var beginPos = getPosition(link, '/', 3) + 1;
	// In hexo 3.1.1, the permalink of "about" page is like ".../about/index.html".
	var endPos = link.lastIndexOf('/') + 1;
    link = link.substring(beginPos, endPos);

    var toprocess = ['excerpt', 'more', 'content'];
    for(var i = 0; i < toprocess.length; i++){
      var key = toprocess[i];

      var $ = cheerio.load(data[key], {         ignoreWhitespace: false,         xmlMode: false,         lowerCaseTags: false,         decodeEntities: false       });

$('img').each(function(){ if ($(this).attr('src')){
			// For windows style path, we replace '\' to '/'.

$$
var src = $(this).attr('src').replace('\\', '/'); 			if(!/http[s]*.*|\/\/.*/.test(src) && 			   !/^\s*\//.test(src)) { 			  // For "about" page, the first part of "src" can't be removed. 			  // In addition, to support multi-level local directory. 			  var linkArray = link.split('/').filter(function(elem){ 				return elem != ''; 			  }); 			  var srcArray = src.split('/').filter(function(elem){ 				return elem != '' && elem != '.'; }); if(srcArray.length > 1) srcArray.shift();
$$

			  src = srcArray.join('/');
$(this).attr('src', config.root + link + src); console.info&&console.info("update link as:-->"+config.root + link + src); } }else{ console.info&&console.info("no src attr, skipped..."); console.info&&console.info($(this));
		}
      });
      data[key] = $.html();     }   } }); ```

同时打开站点配置文件`_config.yml`:
post_asset_folder: true
## 插入PDF文档

官方提供了PDF文档预览的插件,[地址](https://github.com/theme-next/theme-next-pdf)。键入如下命令,即可: ### Step 1 → Go to NexT dir

```bash
cd themes/next
Step 2 → Get module
git clone https://github.com/theme-next/theme-next-pdf source/lib/pdfStep 3 → Set it up
修改主题配置文件_config.yml:
# PDF tag, requires two plugins: pdfObject and pdf.js
# pdfObject will try to load pdf files natively, if failed, pdf.js will be used.
# The following `cdn` setting is only for pdfObject, because cdn for pdf.js might be blocked by CORS policy.
# So, YOU MUST install the dependency of pdf.js if you want to use pdf tag and make it work on all browsers.
# See: https://github.com/theme-next/theme-next-pdf
pdf:
  enable: true
  # Default height
  height: 500px
  pdfobject:
    # Use 2.1.1 as default, jsdelivr as default CDN, works everywhere even in China
    cdn: //fastly.jsdelivr.net/npm/pdfobject@2.1.1/pdfobject.min.js
    # CDNJS, provided by cloudflare, maybe the best CDN, but not works in China
	#cdn: //cdnjs.cloudflare.com/ajax/libs/pdfobject/2.1.1/pdfobject.min.js
Usage:
{% pdf /path/to/your/file.pdf %}根据图像得到Latex公式
个性化返回顶部
将 back-to-top 按钮添加图片背景,并添加 CSS3 动效即可。首先,找到自己喜欢的图片素材放到 themes\next\source\images\目录下。
//自定义回到顶部样式
.back-to-top {
  width: 49px;  //图片素材宽度
  height: 49px;  //图片素材高度
  bottom: unset;
  transition: all .5s ease-in-out;
  background: url("/images/scroll0.png");

  //隐藏箭头图标
  > i {
    display: none;
  }
  &.back-to-top-on {
    //bottom: unset;
    //top: 100vh < (900px + 200px) ? calc( 100vh - 900px - 200px ) : 0px;
  }
}
新增在线聊天tidio
懒得写了,参考这个博主的教程。
新增 clustrmaps
文件路径:themes\next\layout\_partials\footer.swig 页尾增加了访客地图,去这个网站注册,按照步骤添加即可。
valine 添加邮件提醒
主要参考这个链接,相当详细,在此不再赘述。
Gitment 小小改动
文件:~\themes\next\layout\_third-party\comments\gitment.swig,Gitment与Gitmint的css以及js文件上传到网站相应的目录下,分别是:~\themes\next\source\js\src以及~\themes\next\source\css。
<!-- LOCAL: You can save these files to your site and update links -->
    {% if theme.gitment.mint %}
        {% set CommentsClass = "Gitmint" %}
        <link rel="stylesheet" href="https://www.vincentqin.tech/css/gitmint-default.css">
        <script src="https://www.vincentqin.tech/js/src/gitmint.browser.js"></script>
    {% else %}
        {% set CommentsClass = "Gitment" %}
        <link rel="stylesheet" href="https://www.vincentqin.tech/css/gitment-default.css">
        <script src="https://www.vincentqin.tech/js/src/gitment.browser.js"></script>
    {% endif %}
<!-- END LOCAL -->
Valine 刷新后评论消失
参考这个Issue,删除文件.\themes\next\layout\_third-party\analytics\lean-analytics.swig中第四行:
<script src="https://cdn1.lncld.net/static/js/av-core-mini-0.6.4.js">但是这样之后无法显示阅读量了。
删除 Powered by Valine
文件路径: ~/themes/next/layout/_third-party/comments/valine.swig
new Valine({
...
pageSize:'{{ theme.valine.pageSize }}' || 10,
});
{# 新增以下代码即可,可以移除.info下所有子节点。#}
var infoEle = document.querySelector('#comments .info');
if (infoEle && infoEle.childNodes && infoEle.childNodes.length > 0){
  infoEle.childNodes.forEach(function(item) {
    item.parentNode.removeChild(item);
  });
}
网页压缩
参考@muyunyun给出的教程,可以进行如下设置。首先安装hexo-all-minifier,这个模块集成了对 html、css、js、image 的优化。
$ npm install hexo-all-minifier --save ```

然后在根目录下修改站点配置文件`_config.yml`,添加如下命令重新部署即可。

```yaml
html_minifier:
  enable: true
  ignore_error: false
  exclude:

css_minifier:
  enable: true
  exclude:
    - '*.min.css'

js_minifier:
  enable: true
  mangle: true
  output:
  compress:
  exclude:
    - '*.min.js'

image_minifier:
  enable: true
  interlaced: false
  multipass: false
  optimizationLevel: 2
  pngquant: false
  progressive: false
代码区高级设置
可以参考这里:HEXO下的语法高亮拓展修改,具体而言,Markdown的代码段的语法是这样的。 格式:
```[language] [:title] [lang:language] [line_number:(true|false)] [first_line:number] [mark:#,#-#] [diff:true|false] [url:http...]
       code snippet
```    ```

支持的语言包括:c, abnf, accesslog, actionscript, ada, apache, applescript, arduino, armasm, asciidoc, aspectj, autohotkey, autoit, avrasm, awk, axapta, bash, basic, bnf, brainfuck, cal, capnproto, ceylon, clean, clojure, clojure-repl, cmake, coffeescript, coq, cos, cpp, crmsh, crystal, cs, csp, css, d, dart, delphi, diff, django, dns, dockerfile, dos, dsconfig, dts, dust, ebnf, elixir, elm, erb, erlang, erlang-repl, excel, fix, flix, fortran, fsharp, gams, gauss, gcode, gherkin, glsl, go, golo, gradle, groovy, haml, handlebars, haskell, haxe, hsp, htmlbars, http, hy, inform7, ini, irpf90, java, javascript, json, julia, kotlin, lasso, ldif, leaf, less, lisp, livecodeserver, livescript, llvm, lsl, lua, makefile, markdown, mathematica, matlab, maxima, mel, mercury, mipsasm, mizar, mojolicious, monkey, moonscript, n1ql, nginx, nimrod, nix, nsis, objectivec, ocaml, openscad, oxygene, parser3, perl, pf, php, pony, powershell, processing, profile, prolog, protobuf, puppet, purebasic, python, q, qml, r, rib, roboconf, rsl, ruby, ruleslanguage, rust, scala, scheme, scilab, scss, smali, smalltalk, sml, sqf, sql, stan, stata, step21, stylus, subunit, swift, taggerscript, tap, tcl, tex, thrift, tp, twig, typescript, vala, vbnet, vbscript, vbscript-html, verilog, vhdl, vim, x86asm, xl, xml, xquery, yaml, zephir。

以具体的例子进行讲解,以下是一段matlab程序,我们对其位置进行描述同时标记第1,3-4行,修改部分代码。

``` matlab  mark:1,3:4 diff:true first_line=22
r = 7;
eps = 0.0001;
-tic;
+tic
reverseStr = ''  ;
for d=1:nD
        p = weight_cost(:,:,d);
        q = guidedfilter_color(double(img_view), double(p), r, eps);
        weight_cost(:,:,d) = q;
        msg = sprintf('Processing: %d/%d done!\n',d, nD)  ;
        fprintf([reverseStr, msg]);
        reverseStr = repmat(sprintf('\b'), 1, length(msg));
end
fprintf('Final depth estimation completed in %.2f sec\n', toc);
[~,weightD] = max(weight_cost,[],3);
save_img = uint8((256/(nD))*(weightD-1));
imwrite(save_img,strcat(output_path,'SPO_depth.bmp'));
注意,我的网站此处显示有误(先占坑)!另外修改代码块颜色样式,
// 文章```代码块顶部样式
.highlight figcaption {
    margin: 0em;
    padding: 0.5em;
    background: #eee;
    border-bottom: 1px solid #e9e9e9;
}
.highlight figcaption a {
    color: rgb(80, 115, 184);
}
修复行内公式显示乱码
以下解决方案来自这里。
更换Hexo的markdown渲染引擎,hexo-renderer-kramed引擎是在默认的渲染引擎hexo-renderer-marked的基础上修改了一些bug,两者比较接近,也比较轻量级。
npm uninstall hexo-renderer-marked --save
npm install hexo-renderer-pandoc --save
执行上面的命令即可,先卸载原来的渲染引擎,再安装新的。
然后,跟换引擎后行间公式可以正确渲染了,但是这样还没有完全解决问题,行内公式的渲染还是有问题,因为hexo-renderer-kramed引擎也有语义冲突的问题。接下来到博客根目录下,找到node_modules\kramed\lib\rules\inline.js,把第11行的escape变量的值做相应的修改:
// escape: /^\\([\\`*{}$

$()\#$+\-.!_>])/,    escape: /^\\([`*$

$()\#$+\-.!_>])/,
这一步是在原基础上取消了对,{,}的转义(escape)。同时把第20行的em变量也要做相应的修改。
// em: /^\b_((?:__|[\s\S])+?)_\b|^\*((?:\*\*|[\s\S])+?)\*(?!\*)/,
   em: /^\*((?:\*\*|[\s\S])+?)\*(?!\*)/
重新启动hexo(先clean再generate),问题完美解决。哦,如果不幸还没解决的话,看看是不是还需要在使用的主题中配置mathjax开关。如何使用了主题,要在主题(Theme)中开启mathjax开关,下面以next主题为例,介绍下如何打开mathjax开关。进入到主题目录,找到_config.yml配置问题,把mathjax默认的false修改为true,具体如下:
# MathJax Support
mathjax:
  enable: true
  per_page: true
别着急,这样还不够,还需要在文章的Front-matter里打开mathjax开关,如下:
---
title: index.html
date: 2016-12-28 21:01:30
tags:
mathjax: true
--
不要嫌麻烦,之所以要在文章头里设置开关,是因为考虑只有在用到公式的页面才加载 Mathjax,这样不需要渲染数学公式的页面的访问速度就不会受到影响了。
显示文章阅读数量
另外:显示文章阅读量, 服务主要用了LeanCloud服务提供商
官方主题设置
我使用的是Next主题, Make the theme more beautiful, recommended
关于评论系统
多说已死,评论系统转到了Disqus,但是被墙的事实让人感觉不爽。几经周折,从多说转到Disqus,然后在gitment和gitalk之间徘徊,最后还是选择了valine,不过它只能在中国区进行评论,于是我还是保留了gitalk。然而,最后的最后我还是选择了Hypercomment。
2018年6月21日 更新
最近评论系统HyperComments竟然开始收费了,于是我不得不改用新的评论系统LiveRe Gitalk/valine。这样一来,原来的评论都看不到了,由此给大家带来的不便,特此道歉!
Hello everyone, the comment system HyperComments is charging recently, so I had to switch to the new comment system LiveRe. As a result, the original comments are invisible. I deeply apologize for this inconveniences!
关于旋转头像
把侧边栏头像变成圆形&鼠标停留在上面出现旋转效果,具体修改文件的位置是next\source\css\_common\components\sidebar\sidebar-author.styl。更为具体的修改过程见Ehlxr写的这篇博客。
.site-author-image {
  display: block;
  margin: 0 auto;
padding: $site-author-image-padding; max-width: $site-author-image-width;   height: $site-author-image-height;   border: $site-author-image-border-width solid $site-author-image-border-color;

  /* 头像圆形 */
  border-radius: 80px;
  -webkit-border-radius: 80px;
  -moz-border-radius: 80px;
  box-shadow: inset 0 -1px 0 #333sf;
  /* 设置循环动画 [animation: (play)动画名称 (2s)动画播放时长单位秒或微秒 (ase-out)动画播放的速度曲线为以低速结束
    (1s)等待1秒然后开始动画 (1)动画播放次数(infinite为循环播放) ]*/
  -webkit-animation: play 2s ease-out 1s 1;
  -moz-animation: play 2s ease-out 1s 1;
  animation: play 2s ease-out 1s 1;

  /* 鼠标经过头像旋转360度 */
  -webkit-transition: -webkit-transform 1.5s ease-out;
  -moz-transition: -moz-transform 1.5s ease-out;
  transition: transform 1.5s ease-out;
}

img:hover {
  /* 鼠标经过头像旋转360度 */
  -webkit-transform: rotateZ(360deg);
  -moz-transform: rotateZ(360deg);
  transform: rotateZ(360deg);
}
背景颜色设置
其实NEXT主题已经自带了几种动画了,我用的是three_waves;但是呢,存在一个问题就是因为Blog背景是透明的,这样文字和背景动画就有重叠效果了,很不方便阅读,这时把背景色设置为白色即可。添加background: white到如下路径next\source\css\_schemes\Muse\_layout.styl
.header-inner, .container .main-inner, .footer-inner {
  background: white;
  +mobile() { width: auto; }
}
页面宽度设置
固定主题页面最大宽度,可以参考这个链接。 有时候我们可能会嫌弃博客的页面太小,留白过大。这时候可以对页面宽度进行设置,可以参考Hexo Next主题 Issue #759。对于 Pisces Scheme,需要同时修改 header 的宽度、.main-inner 的宽度以及 .content-wrap 的宽度。例如,使用百分比(Pisces 的布局定义在 source/css/_schemes/Picses/_layout.styl 中):
.header{ width: 80%; } /* 80% */
.container .main-inner { width: 80%; } /* 80% */
.content-wrap { width: calc(100% - 260px); }
优化友情链接
新建一个Friends页面:
hexo new page Friends新建样式,进入themes\next\source\css\_custom\custom.styl,在最后新加上几行代码:
$shadowColor = #333; $themeColor = #222;
$link-image-size  = 180px;

.link-body{
	ul{
		display: flex;
		justify-content: space-between;
		align-items: center;
		flex-wrap: wrap;
		margin: 0;
		padding: 0;
		.link{
max-width: $link-image-size; min-width: $link-image-size; max-height: $link-image-size; min-height: $link-image-size;

			position: relative;
 box-shadow: 0 0 1px $shadowColor; magin: 6px; width: 20%; list-style: none!important; overflow: hidden; border-radius: 6px; img{ object-fit: cover; transition: transform .6s ease-out; vertical-align: middle; border-bottom: 4px solid #eee;//#e5642b; transition: 0.4s ; width: 100%; border-radius: 90px 90px 90px 90px;

				display: inline-block;
				float: none;
				vertical-align: middle;
			}
			.link-name{
				position: absolute;
				bottom: 0;
				width: 100%;
				color: #666;
				text-align: center;
				text-shadow: 0 0 1px rgba(0,0,0,.4);
				background: rgba(255,255,255,.7);
			}
			&:hover{
				img{
					overflow: hidden;
					//transition: 0.4s;
					border-radius: 0 0 0 0;
				}
				.link-name{
color: $themeColor; text-shadow: 0 0 1px $themeColor;
				}
			}
		}
	}
}然后编辑站点的source\Friends下的index.md文件,内容如下:
	<ul>
	<!--your friend begin-->
	<li class="link"><a href="your_friends_link" title="balabala" target="_blank" >
        <img src= "image_path" alt="balabala"/>
         balabala</a></li>
	<!--your friend end-->

	<!--your another friend begin-->
	<li class="link"><a href="your_friends_link" title="balabala" target="_blank" >
        <img src= "image_path" alt="balabala"/>
         balabala</a></li>
	<!--your another friend end-->
	</ul>
此时,点击友情链接可能不会跳转到相应的页面,参考这个issue,作以下修改。
wrapImageWithFancyBox: function () {
$('.content img')   .not('[hidden]')   .not('.group-picture img, .post-gallery img')   .not('a img') // 这里添加 ```

## 增加Gitter

参考[sidecar](https://sidecar.gitter.im)的示例,在`themes\next\layout\_layout.swig`的`</body>`前增加如下代码: 路径:`文件路径:themes\next\layout\_layout.swig`.

```html
<!-- add gitter on sidebar -->
<script>
  ((window.gitter = {}).chat = {}).options = {
    room: 'your_chat_room_name'
  };
</script>
<script src="https://sidecar.gitter.im/dist/sidecar.v1.js" async defer></script>其中的room换成你自己在gitter创建的聊天室名字,例如我的是vincentqin-blog-chat/Lobby,所以我的设置room: 'vincentqin-blog-chat/Lobby'。之后可以在themes\next\source\css\_custom\custom.styl里增加如下设置:
// adjust the position of gitter
.gitter-open-chat-button {
      right: 20px;
	  padding: 10px;
	  background-color: #777;
}

@media (max-width: 600px) {
    .gitter-open-chat-button,
    .gitter-chat-embed {
        display: none;
    }
}
添加页面背景
将背景图片放在themes\next\source\images下,例如bg.jpg,然后themes\next\source\css\_custom\custom.styl里增加如下设置:
@media screen and (min-width:720px) {

    body {
	background:url(/images/bg.jpg);
    background-repeat: no-repeat;
    background-attachment:fixed; // 鼠标滚动背景不动
    background-position:50% 50%;
    }
    #footer {
        color:#c8c8c8;
    }
}
添加fork me on github
文件位置:\themes\next\layout\_layout.swig,在“下一行添加如下代码。
<a href="https://www.github.com/Vincentqyw" class="github-corner" aria-label="View source on Github"><svg width="80" height="80" viewBox="0 0 250 250" style="fill:#151513; color:#fff; position: absolute; top: 0; border: 0; right: 0;" aria-hidden="true"><path d="M0,0 L115,115 L130,115 L142,142 L250,250 L250,0 Z"></path><path d="M128.3,109.0 C113.8,99.7 119.0,89.6 119.0,89.6 C122.0,82.7 120.5,78.6 120.5,78.6 C119.2,72.0 123.4,76.3 123.4,76.3 C127.3,80.9 125.5,87.3 125.5,87.3 C122.9,97.6 130.6,101.9 134.4,103.2" fill="currentColor" style="transform-origin: 130px 106px;" class="octo-arm"></path><path d="M115.0,115.0 C114.9,115.1 118.7,116.5 119.8,115.4 L133.7,101.6 C136.9,99.2 139.9,98.4 142.2,98.6 C133.8,88.0 127.5,74.4 143.8,58.0 C148.5,53.4 154.0,51.2 159.7,51.0 C160.3,49.4 163.2,43.6 171.4,40.1 C171.4,40.1 176.1,42.5 178.8,56.2 C183.1,58.6 187.2,61.8 190.9,65.4 C194.5,69.0 197.7,73.2 200.1,77.6 C213.8,80.2 216.3,84.9 216.3,84.9 C212.7,93.1 206.9,96.0 205.4,96.6 C205.1,102.4 203.0,107.8 198.3,112.5 C181.9,128.9 168.3,122.5 157.7,114.1 C157.9,116.9 156.7,120.9 152.7,124.9 L141.0,136.5 C139.8,137.7 141.6,141.9 141.8,141.8 Z" fill="currentColor" class="octo-body"></path></svg></a><style>.github-corner:hover .octo-arm{animation:octocat-wave 560ms ease-in-out}@keyframes octocat-wave{0%,100%{transform:rotate(0)}20%,60%{transform:rotate(-25deg)}40%,80%{transform:rotate(10deg)}}@media (max-width:500px){.github-corner:hover .octo-arm{animation:none}.github-corner .octo-arm{animation:octocat-wave 560ms ease-in-out}}</style>更多样式,参考这里。
MarkDown编辑器
推荐Haroopad
插入PDF文档以及图片
-
插入PDF文档: 将相应的PDF文档放在与博客标题同名的文件夹内,然后再按照如下方式进行插入。
[点我,这里是PDF文档](latex入门教程.pdf) -
利用html
img标签嵌入图片<img src= image_path alt="Lytro相机" width="100%"> <center>Lytro</center>注意以上的
image_path既可以是图床中的路径,亦可以把图片放在source/images/文件下,然后image_path=/images/logo.png,当然也可以如下插入图片,更加方便。 -
利用插件,以下我在Github上找到的别人已经做好的一个小工具。 安装插件hexo-tag-asset-res,打开Git Shell, 在Hexo根目录下, 输入如下代码:
$ npm install hexo-tag-asset-res --save     ```

修改Hexo根目录下\_config.yml文件:打开Hexo根目录, 找到站点配置文件`_config.yml`文件, 用任何一个文本编辑器打开, 找到如下代码:

```javascript
post_asset_folder: false
将
false改成true即可。测试插入代码:<center>{% asset_img Naruto.jpg Naruto%}</center>效果如下:

配置个性化的字体
在themes\next\source\css\_variables\custom.styl文件中添加如下内容。
// 修改成你期望的字体族
$font-family-base = "Monda","Microsoft YaHei", Verdana, sans-serif // 标题,修改成你期望的字体族 $font-family-headings = "Roboto Slab", Georgia, sans
// 代码字体
$code-font-family = "PT Mono", "Input Mono", Consolas, Monaco, Menlo, monospace // 博客字体 $font-family-posts = "Monda"
// logo字体
$font-family-logo = "Lobster Two" ```
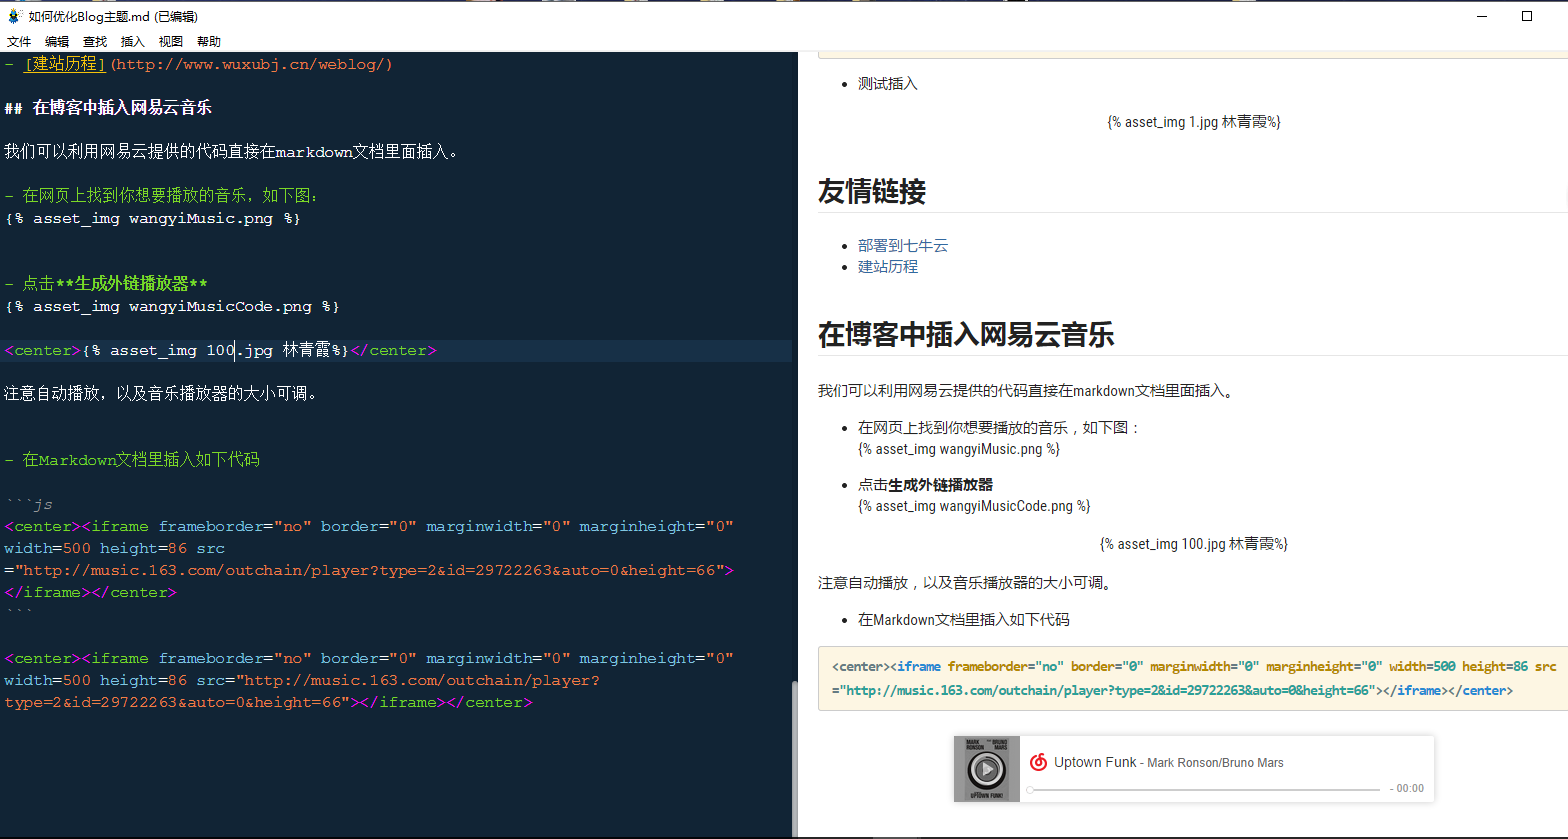
## 在博客中插入网易云音乐
我们可以利用网易云提供的代码直接在markdown文档里面插入。
- 在网页上找到你想要播放的音乐,如下图:

- 点击**生成外链播放器**
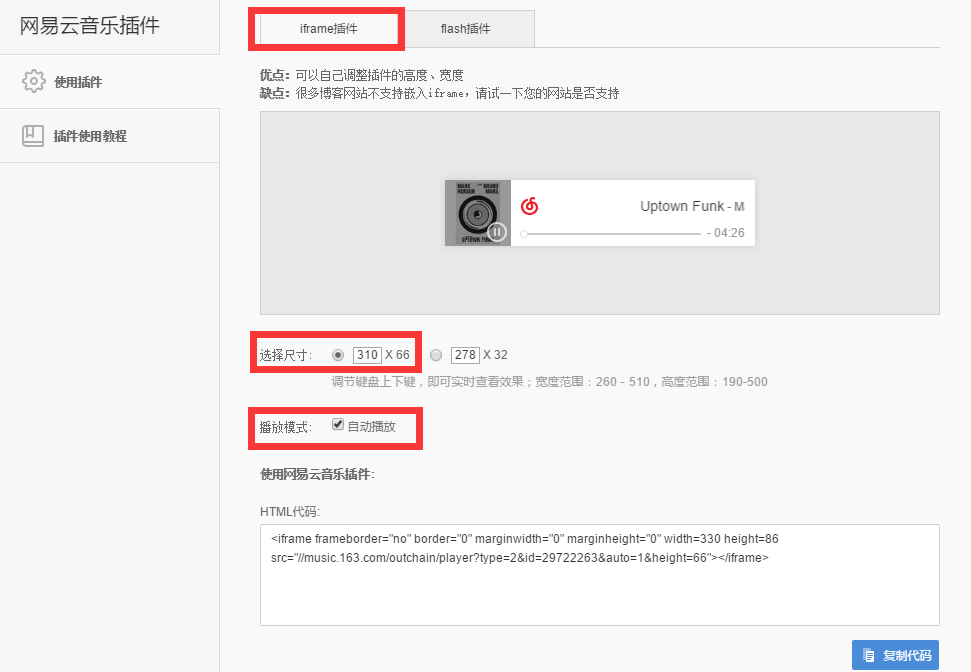
注意自动播放,以及音乐播放器的大小可调。
- 在Markdown文档里插入如下代码
播放视频
推荐使用Dplayer。首先在站点文件夹根目录安装Dplayer插件:
npm install hexo-tag-dplayer --save然后文章中的写法:
{% dplayer url="https://******.mp4" "http://******.jpg" "api=https://api.prprpr.me/dplayer/" "id=" "loop=false" %}要使用弹幕,必须有api和id两项。id 的值自己随便取,唯一要求就是前面这点。可以通过这里获取id,保证每次都不一样。
献上Maddi Jane 翻唱的Jessie J的Price Tag。
同时部署
接下来主要涉及到以hexo框架搭建博客的版本管理。同时部署其实很简单,仅仅修改站点配置文件的_config.yml即可。在最后的deploy底下新增一项:
repo:
github: https://github.com/Your_Github_ID/Github_ID.github.io.git
coding: https://git.coding.net/Your_Coding_ID/Your_Repo_Name.coding.me.git以后hexo d时,就会同时部署到github和coding。
版本管理
方案 1(推荐)
下载第三方插件,more information refers to this link hexo-git-backup. When you are well configured, you can just run the following command.
hexo backup #或 hexo b方案 2
这里涉及到git的部分知识。 > 目的:实现整个blog源码级别的代码管理,包括站点配置&主题配置。
首先明确一点,在每次hexo d时,都会自动产生一个名为.deploy_git的文件夹,这个文件夹下包含有hexo g渲染出的各种文件,这些文件就是构成github page或者coding page的重要源码;同时会自动的将这个.deploy_git设置成本地仓库,即产生一个.git的隐藏文件。我们做的事情和以上过程不尽一致,总结起来主要是以下几个命令。 首先建立一个名为.gitignore的文件,表示我们并不上传这些文件,原因后续介绍。其内容为:
.DS_Store
Thumbs.db
db.json
*.log
node_modules/
public/
.deploy*/
themes/
接下来就是把blog的源文件夹搞成一个本地仓库,如下命令。
# 创建仓库
git init
# 为本地仓库添加文件
git add -A
# 提交到本地仓库
git commit -m "your message"
# 添加一个名为 origin 的远程,这个名字随便起
git remote add origin https://github.com/Your_Github_ID/Your_Repo_Name.git
# 为其添加 push 到 Github 的地址
git remote set-url --add --push origin https://github.com/Your_Github_ID/Your_Repo_Name.git
# 为其添加 push 到 Coding 的地址
git remote set-url --add --push origin https://git.coding.net/Your_Coding_ID/Your_Repo_Name.git
# push到远端的master分支
git push --set-upstream origin master
# 新建并切换分支
git checkout -b "another-branch"
# 各种更改文件......推送到远程
git push --set-upstream origin another-branch
# 以后可以直接 git push,不用set了。通过以上命令,我们就可以同时部署在github仓库https://github.com/Your_Github_ID/Your_Repo_Name.git和coding仓库https://git.coding.net/Your_Coding_ID/Your_Repo_Name.git了。
设置主题远程仓库
这时你会发现themes这个文件夹并没有同时被上传到远程仓库,同上操作,将theme/next设置成本地仓库并部署。之所以将这个仓库单独上传,是为了方便切换主题,以及主题升级。
设置node_modules远程仓库
之所以将这个模块单独拎出来处理,是因为这个文件夹虽然容量不大,但是其中文件个数特别多。当和blog源文件一同被git add到暂存区之后,git shell的运行速度就会超慢。我的解决思路就是将其创建成一个仓库,这样git shell的速度就会快一些。具体步骤不再赘述,同上。
结语
经过建立以上的3个仓库,实现了blog源码级别的版本管理。当然,如果你不想暴露自己的源码,那么你只需要在coding申请一个私有仓库并部署就ok了。虽然看起来有些麻烦,但是一旦配置完毕之后,我们就只需要以下几个步骤就可以实现管理。
hexo clean  # 不是必要步骤
hexo d -g   # 渲染+部署到github page以及coding page
git add .   # 添加到暂存区
git commit -m "your message" # push到本地仓库
git push    # 上传到远程仓库(站点目录、next主题目录、node_modules目录)
Good luck:)
所有配置集锦
最后附上我的全部配置。文件位置:themes\next\source\css\_custom\custom.styl。
// Custom styles.

//修改文章内code样式
code {color:#c7254e;background:#f9f2f4;border:1px solid #d6d6d6;}

//修改文章中图片样式,改为居中
.posts-expand .post-body img {
	margin: 0 auto;
}

// 更改文中链接的颜色
.post-body p a {
color: $orange; text-decoration: none; border-bottom: 1; &:hover { color: $blue;
    //text-decoration: underline;
  }
}

// 增大post之间的margin
.post {
    margin-bottom: 30px;
    //padding: 45px 36px 36px 36px;
    //box-shadow: 0px 0px 10px 0px rgba(0, 0, 0, 0.5);
    background-color: rgba(255, 255, 255,0.8);
}
// delete the border of image
.posts-expand .post-body img {
    border: none;
    padding: 0px;
}

// [Read More]按钮样式: 黑底绿字
.post-button .btn:hover {
    color: rgb(136, 255, 13) !important;
	background-color: rgba(0, 0, 0, 0.75); //black
}
// 页面底部页码
.pagination .page-number.current {
    border-radius: 100%;
    background-color: rgba(100, 100, 100, 0.75);
}
// 页面底部页码, 去除鼠标置于上方时,数字上方的线
.pagination .prev, .pagination .next, .pagination .page-number {
    margin-bottom: 10px;
    border: none;
	color: rgb(1, 1, 1);
}

// 页面底部页码,鼠标置于上方,黑底绿字
.page-number:hover,.page-number:active{
	color: rgb(136, 255, 13);
	border-radius: 100%;
    //background-color: rgba(255, 0, 100, 0.75); //品红
	background-color: rgba(0, 0, 0, 0.75); //black
}
.pagination .space {
    color: rgb(0, 0, 0);
}
.pagination {
    border: none;
    margin: 0px;
}

// 已运行时间
#days {
    display: block;
    color: rgba(0, 0, 0,0.75);
    font-size: 13px;
    margin-top: 15px;
}

// 自定义页脚跳动的心样式
@keyframes heartAnimate {
    0%,100%{transform:scale(1);}
    10%,30%{transform:scale(0.9);}
    20%,40%,60%,80%{transform:scale(1.1);}
    50%,70%{transform:scale(1.1);}
}
#heart {
    animation: heartAnimate 1.0s ease-in-out infinite;
}
.with-love {
    color: rgb(236, 25, 27);
}

// 自定义的文章置顶样式
.post-sticky-flag {
    font-size: inherit;
    float: right;
    color: rgb(0, 0, 0);
    cursor: help;
    transition-duration: 0.2s;
    transition-timing-function: ease-in-out;
    transition-delay: 0s;
}
.post-sticky-flag:hover {
    color: #07b39b;
}

// 右下角返回顶部按钮样式

.back-to-top:hover {
    color: rgb(136, 255, 13);
	background-color: rgba(0, 0, 0, 0.75); //black
}

// 下载样式
a#download {
	display: inline-block;
	padding: 0 10px;
	color: #000;
	background: transparent;
	border: 2px solid #000;
	border-radius: 2px;
	transition: all .5s ease;
	font-weight: bold;
	&:hover {
		background: #000;
		color: #fff;
	}
}

// 颜色块-黄
span#inline-yellow {
	display:inline;
//	padding:.2em .6em .3em;
	padding:.1em .4em .1em;
	font-size:90%;
	font-weight:bold;
	line-height:1;
	color:#fff;
	text-align:center;
	white-space:nowrap;
	vertical-align:baseline;
	border-radius:0;
	background-color: #f0ad4e;
}
// 颜色块-绿
span#inline-green {
	display:inline;
//	padding:.2em .6em .3em;
	padding:.1em .4em .1em;
	font-size:90%;
	font-weight:bold;
	line-height:1;
	color:#fff;
	text-align:center;
	white-space:nowrap;
	vertical-align:baseline;
	border-radius:0;
	background-color: #5cb85c;
}
// 颜色块-蓝
span#inline-blue {
	display:inline;
//	padding:.2em .6em .3em;
	padding:.1em .4em .1em;
	font-size:90%;
	font-weight:bold;
	line-height:1;
	color:#fff;
	text-align:center;
	white-space:nowrap;
	vertical-align:baseline;
	border-radius:0;
	background-color: #2780e3;
}
// 颜色块-紫
span#inline-purple {
	display:inline;
//	padding:.1em .2em .1em;
	padding:.1em .4em .1em;
	font-size:90%;
	font-weight:bold;
	line-height:1;
	color:#fff;
	text-align:center;
	white-space:nowrap;
	vertical-align:baseline;
	border-radius:0;
	background-color: #9954bb;
}
// 颜色块-红
span#inline-red {
	display:inline;
//	padding:.2em .6em .3em;
	padding:.1em .4em .1em;
	font-size:90%;
	font-weight:bold;
	line-height:1;
	color:#fff;
	text-align:center;
	white-space:nowrap;
	vertical-align:baseline;
	border-radius:0;
	background-color: #df3e3e;
}

// 左侧边框红色块级
p#div-border-left-red {
	display: block;
	padding: 10px;
	margin: 10px 0;
	border: 1px solid #ccc;
	border-left-width: 5px;
	border-radius: 3px;
	border-left-color: #df3e3e;
}
// 左侧边框黄色块级
p#div-border-left-yellow {
	display: block;
	padding: 10px;
	margin: 10px 0;
	border: 1px solid #ccc;
	border-left-width: 5px;
	border-radius: 3px;
	border-left-color: #f0ad4e;
}
// 左侧边框绿色块级
p#div-border-left-green {
	display: block;
	padding: 10px;
	margin: 10px 0;
	border: 1px solid #ccc;
	border-left-width: 5px;
	border-radius: 3px;
	border-left-color: #5cb85c;
}
// 左侧边框蓝色块级
p#div-border-left-blue {
	display: block;
	padding: 10px;
	margin: 10px 0;
	border: 1px solid #ccc;
	border-left-width: 5px;
	border-radius: 3px;
	border-left-color: #2780e3;
}
// 左侧边框紫色块级
p#div-border-left-purple {
	display: block;
	padding: 10px;
	margin: 10px 0;
	border: 1px solid #ccc;
	border-left-width: 5px;
	border-radius: 3px;
	border-left-color: #9954bb;
}
// 右侧边框红色块级
p#div-border-right-red {
	display: block;
	padding: 10px;
	margin: 10px 0;
	border: 1px solid #ccc;
	border-right-width: 5px;
	border-radius: 3px;
	border-right-color: #df3e3e;
}
// 右侧边框黄色块级
p#div-border-right-yellow {
	display: block;
	padding: 10px;
	margin: 10px 0;
	border: 1px solid #ccc;
	border-right-width: 5px;
	border-radius: 3px;
	border-right-color: #f0ad4e;
}
// 右侧边框绿色块级
p#div-border-right-green {
	display: block;
	padding: 10px;
	margin: 10px 0;
	border: 1px solid #ccc;
	border-right-width: 5px;
	border-radius: 3px;
	border-right-color: #5cb85c;
}
// 右侧边框蓝色块级
p#div-border-right-blue {
	display: block;
	padding: 10px;
	margin: 10px 0;
	border: 1px solid #ccc;
	border-right-width: 5px;
	border-radius: 3px;
	border-right-color: #2780e3;
}
// 右侧边框紫色块级
p#div-border-right-purple {
	display: block;
	padding: 10px;
	margin: 10px 0;
	border: 1px solid #ccc;
	border-right-width: 5px;
	border-radius: 3px;
	border-right-color: #9954bb;
}
// 上侧边框红色
p#div-border-top-red {
	display: block;
	padding: 10px;
	margin: 10px 0;
	border: 1px solid #ccc;
	border-top-width: 5px;
	border-radius: 3px;
	border-top-color: #df3e3e;
}
// 上侧边框黄色
p#div-border-top-yellow {
	display: block;
	padding: 10px;
	margin: 10px 0;
	border: 1px solid #ccc;
	border-top-width: 5px;
	border-radius: 3px;
	border-top-color: #f0ad4e;
}
// 上侧边框绿色
p#div-border-top-green {
	display: block;
	padding: 10px;
	margin: 10px 0;
	border: 1px solid #ccc;
	border-top-width: 5px;
	border-radius: 3px;
	border-top-color: #5cb85c;
}
// 上侧边框蓝色
p#div-border-top-blue {
	display: block;
	padding: 10px;
	margin: 10px 0;
	border: 1px solid #ccc;
	border-top-width: 5px;
	border-radius: 3px;
	border-top-color: #2780e3;
}
// 上侧边框紫色
p#div-border-top-purple {
	display: block;
	padding: 10px;
	margin: 10px 0;
	border: 1px solid #ccc;
	border-top-width: 5px;
	border-radius: 3px;
	border-top-color: #9954bb;
}

// gitalk config.
.gitalk_title {
    display: inline-block;
    padding: 0 15px;
    color: #0a9caf;
    border: 1px solid #0a9caf;
    border-radius: 4px;
    cursor: pointer;
    font-size: 14px;
    // float: left;
}
.gitalk_title:hover {
    color: #fff;
    background: #0a9caf;
}
.gitalk_container {
    margin-bottom: 50px;
    border-bottom: 1px solid #e9e9e9;
}

$shadowColor = #333 $themeColor = #222
$link-image-size-width = 180px; $link-image-size-height = 230px;

.link-body{
	ul{
		display: flex;
		justify-content: space-between;
		align-items: center;
		flex-wrap: wrap;
		margin: 0;
		padding: 0;

		.link{
max-width: $link-image-size-width; min-width: $link-image-size-width; max-height: $link-image-size-height; min-height: $link-image-size-height;

			position: relative;
 box-shadow: 0 0 1px $shadowColor; magin: 6px; width: 20%; list-style: none!important; overflow: hidden; border-radius: 6px; img{ object-fit: cover; transition: transform .6s ease-out; vertical-align: middle; border-bottom: 4px solid #eee;//#e5642b; transition: 0.4s ; width: 100%; border-radius: 90px 90px 90px 90px;
				display: inline-block;
				float: none;
				vertical-align: middle;
			}
			.link-name{
				position: absolute;
				bottom: 53px;
				width: 100%;
				color: #666;
				text-align: center;
				//text-shadow: 0 0 1px rgba(0,0,0,.4);
				background: rgba(255,255,255,.8);
			}
			.link-name-below{
				position: absolute;
				bottom: 0;
				font-size: 13px;
				font-weight: 300;
				margin: 0 0 15px;
				line-height: 13px;
				width: 100%;
				color: #666;
				text-align: center;
				//text-shadow: 0 0 1px rgba(0,0,0,.4);
				//background: rgba(255,255,255,.7);
			}
			&:hover{
				img{
					overflow: hidden;
					//transition: 0.4s;
					border-radius: 0 0 0 0;
				}
				.link-name{
color: $themeColor; font-weight: bold; text-align: center; //text-shadow: 0 0 1px $themeColor;
				}
			}
		}
	}
}
// adjust the position of gitter
.gitter-open-chat-button {
      right: 20px;
	  padding: 10px;
	  background-color: rgba(45,45,45,0.80);
	  color: rgba(255,255,255,0.75)
}
@media (max-width: 600px) {
    .gitter-open-chat-button,
    .gitter-chat-embed {
        display: none;
    }
}
@media screen and (min-width:1200px) {

    body {
	background:url(/images/50.jpg);
    background-repeat: no-repeat;
    background-attachment:fixed;
    background-position:50% 50%;
    }

    #footer {
        color:#c8c8c8;
    }
}
#coding:link,#coding:visited{
	color: rgb(153,153,153);
	//font-weight: normal;
	text-decoration: none;
}

#coding:hover,#coding:active{
	color: rgb(153,153,153);
	text-decoration: none;
}